Whimsical Wood Blog Pages

Home Page www.whimsicalwood.com

This blog features the current woodcraft, Art and Graphic work of David Stanley.

Thursday, August 16, 2012

Cherry blossom Lovespoon and Home-made Tools


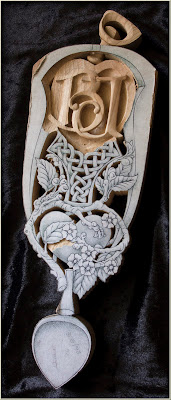
I have now continued with carving the front the celtic knot section and some more of the cherry branch above the cherry branch cage. I will have to decide on the thickness and three dimensional form of this section as I approach work on the back of the spoon.


Likewise it will be necessary to make a number of other decisions about where the connecting parts of the cherry branch that form the cage will be located, as carving proceeds. This is always an intuitive process and involves sketching in in ideas on the carving and sometimes taking up the suggestions that occur from those incidental forms that occur as waste is removed.


Whereas the shallow depth of timber to carve, was a problem with the stems and leaves forming the front surface of the cage, the massive thickness of the other leaf shapes poses the opposite problem, where a delicate look needs to be presented from each view but something believable and different in shape has to be indicated on the other side.


Every now and then I will return to tidy up the hollowed-bowl area behind the initials to get nice fair curves where the forms intersect. It is a good idea to swing the light source into various oblique positions from time to time to get a raking light that will show the true nature of the forms viewed from a variety of angles. This will also show up any unattractive surface irregularities that need to be gently carved away.


Here is an account of the rough method I use to make the small chisels from piano wire.


I use various thicknesses of piano or music wire to make the tools. The one and a half millimetre size seems to be the most useful diameter. The wire is worked cold, on a small anvil (any reasonable steel surface), with a ball-pane hammer. this produces a fishtail shape and has the added advantage of work hardening what will be the cutting edge of the chisel.


The result of all this hammering will be a ragged fishtail shaped end on the wire, I have made no attempt to be neat with my hammering here.


The ragged edge can then be gently ground away or sanded away to a straight, skewed or rounded edge.  I prefer a rounded edge as this way the chisel functions as a gouge.
It is a little more difficult to grind or sand a cutting edge on the curved shape but it is worth the effort. Straight chisels are still useful though.

I use wet and dry sand paper to 'grind' the cutting edge on the tool as it doesn't take long at this size and there is then no risk of drawing the temper on the tool.


The next step is to use increasingly finer grits to hone the edge and finally polish with stropping compound. The whole process is very easy, very cheap and you can therefore afford to experiment with different shapes and you can bend the wire into a variety of cranked patterns.


Small allen keys can also be used to make miniature chisels. However the hammering will not work as these tools are already hardened. Allen Keys cannot be bent safely either, as they will snap and flying pieces can endanger you. To break off the right-angled section use two pair of pliers and take the precaution of covering the whole operation with a cloth to stop any flying bits.  


Here is the tool I made for this demonstration, being used on a small piece of holly. The rounded-hooked-fishtail shape will make a useful tool for 'walking' heel and toe fashion to make a stop cut along a path.


The small chisel from an allen key will make a good miniature mortise chisel.

Sunday, August 12, 2012

Wedding Lovespoon and Workspace


After seeing Laura Jenkins' blog entry showing her work space for love spoon carving I thought that I would show my very similar setup for anyone interested. I do most of my lovespoon carving seated in an armchair with a lap bench/tool holder on which I do the work.

The lap bench sits across my lap as I sit in the chair.
Old towels placed over the work board are used to protect the work and to collect chips. 


The lap board itself has a part circle cut-out in the front and a purpose-shaped section added to the back acting as a shelf to hold some folding tool racks.

Some small cup hooks allow restraining rubber bands to secure the tool racks to the work board. The rubber bands attach over the back to a hinged section which holds the tool racks in place. 


The rubber bands and the hinged section prevent the tool racks from falling off the board when it is moved.


A towel with a clipped on neck-strap lays over the work board surface and is pinned in place with drawing pins when in use.


Carving work is carried out on the towel surface and the neck strap and towel can be folded forward after work is finished thus protecting the work and capturing all the chips an other carving debris. 


Some of my tools are kept in  small tool rolls sewn together from some scraps of leather that I'd collected from a throw-out years ago. Some of the tools shown here include a number of home made tools from music wire which can be bent into any needed shape and held in small chucked tool holder.


These home-made tools are very easy to make, very cheap and mostly, extremely useful, because they were made for a specific purpose.


I have been working on this love spoon for a little while now. It is intended for my daughter's wedding coming up soon. The spoon is being carved in English Cherry and features a swivel at the top and a loose heart captured  by a cherry blossom cage leading to the stem and bowl. Towards the top of the spoon are the couples initials ( Brad and Jessica ). Under the initials is a single strand celtic knot.


The initials are set above a heart shape and are entirely under-cut except where they attach to the outer rim of the hollowed heart shape. It was this under cutting which necessitated the making of some heavily cranked mini chisels to reach into the more restricted areas.


There were some even more restricted areas to carve with the cherry blossom cage with the loose heart.


I worked on the initials first to solve some of the problems to be encountered reaching those difficult to get at areas that i knew would be even more critical when I attempted the cage area.


The initials had some sections where they would pierce one another and I will be spending some time on these later to achieve nice transitions and fair curves in an area likely to attract more close scrutiny and so finicky attention to detail will pay off.


One of the difficulties in the cage section would be the lack of depth in the blank. I could have used a bit more thickness here to get some more depth and robustness to the leaves and flowers not to mention space to free the heart shape within.

As it turned out it these elements are about as thin and delicate as I dare make them and the upper flowers will be a little flatter than I'd like.


It is this sort of situation where the cranked chisel bits are at their most useful in paring the waste from under overlapping elements that need complete separation.